之前自己做 Ethereum 的專案時,常常是自己拿 Web3.js 或 Ethers.js 來做,包含前一次的幣安黑客松作品也是這樣來的。最近看到 Solidity 讀書會 上面有人分享 EthWorks 的 Bounty Program 而發現新玩具,也稍微把玩了一下。這篇就來記錄一下,順便看能不能做出什麼去投 Bounty。
TL;DR
在快速把玩下,可以簡單說這個工具有點過新,所以文件上有許多是直接沒寫內容的(說不定有些隱藏功能甚至沒有寫進文件)。但這個工具提供了許多 Hook,也幫忙處理許多如切換帳戶的瑣事。過去利用 Web3/Ethers 時需要自己去註冊監聽,透過 useDApp 就可以更好的運用 Hook 來完成這些事情。
此外,useDApp 會將多個 Function Call 透過 Multicall 的方式包裝,進而降低 RPC 的呼叫。一面對於使用者端降低網路開銷,一面也減輕 RPC 節點的消耗,特別是如 Infura 這種有限額的服務。
你可以在 https://github.com/flyinglimao/usedapp-demo 下載下面的程式碼,或到 https://flyinglimao.github.io/usedapp-demo 看看效果。
開始使用
你可能會需要一個 React 專案來開始:
1
| npx create-react-app usedapp-demo --template typescript
|
後面的 --template typescript 是我習慣,同時也因為文件可能不夠完整,透過 TypeScript 來幫忙,不喜歡或不會 TypeScript 的可以自行移除。
備註:下面的圖片有用 Styled-Component 包過,看起來和實際程式碼會不同
接著安裝 useDApp:
同樣,喜歡 npm 的朋友可以改用 npm install @usedapp/core。
安裝完後,我們需要一個 DAppProvider:
1
2
3
4
5
6
7
8
9
10
11
12
13
14
15
16
17
18
19
20
|
import { Config, ChainId, DAppProvider } from '@usedapp/core';
const config: Config = {
readOnlyChainId: ChainId.Kovan,
readOnlyUrls: {
[ChainId.Kovan]: '',
},
}
function App() {
return (
<DAppProvider>
</DappProvider>
);
}
|
連接錢包
連接錢包的函數通過 useEthers() 提供,可以通過檢查 account 來判斷是否連接:
1
2
3
4
5
6
7
8
9
10
11
12
| function Connect() {
const { activateBrowserWallet, account, error } = useEthers();
useEffect(() => {
if (error) alert(error);
}, [error]);
return account ? (
<h1>{account}</h1>
) : (
<button onClick={() => activateBrowserWallet()}>連接錢包</button>
);
}
|
當使用者端沒有錢包卻點連接時,error 會設定,要注意的是 error 只會出現一瞬間,所以這邊用 useEffect 來抓,但感覺應該會有變動,參考本文時請留意這點。
可以試著在錢包中切換帳戶,會注意到他的地址跟著變了。 
取得餘額
取得 ETH 餘額應該也是經常用到的功能,可以利用 useEtherBalance。如果要取得 ERC-20 的代幣可以用 useTokenBalance。
1
2
3
4
5
6
7
8
9
10
11
12
13
14
15
16
17
18
19
20
| import { useEtherBalance, useEthers, useTokenBalance } from "@usedapp/core";
import { formatEther, formatUnits } from "@ethersproject/units";
export default function Balance() {
const { account } = useEthers();
const ethBalance = useEtherBalance(account);
const usdcBalance = useTokenBalance(
"0xe22da380ee6b445bb8273c81944adeb6e8450422",
account
);
return account ? (
<div>
<h1>Ethers: {ethBalance ? formatEther(ethBalance) : 0}</h1>
<h1>USDC: {usdcBalance ? formatUnits(usdcBalance, 6) : 0}</h1>
</div>
) : (
<h1>Not Connect Yet</h1>
);
}
|
這邊用了 Ethers.js 的函數來顯示,需要的話可以用 yarn add ethers 安裝。另外可以試著在錢包裡面轉帳,過一段時間後就會看到數字變了。 
呼叫合約
作為一個 DApp,沒有合約可說是太奇怪了。如果要取得合約的值(不必發起交易的那些),可以用 useContractCall,這裡會需要用 Ethers.js 的 Interface:
1
2
3
4
5
6
7
8
9
10
11
12
13
14
15
16
17
18
19
20
21
22
23
24
25
26
27
28
29
30
31
32
33
34
35
36
37
38
39
40
41
42
43
44
45
46
47
48
49
50
51
52
53
54
| import { Interface } from "@ethersproject/abi";
import { useContractCall, useContractCalls } from "@usedapp/core";
import { ChangeEvent, useState } from "react";
const abiJSON = [
];
const abi: Interface = new Interface(abiJSON);
export default function Contract() {
const { account } = useEthers();
const [address, setAddress] = useState(
"0xe22da380ee6b445bb8273c81944adeb6e8450422"
);
const tokenName = useContractCall({
abi,
address,
method: "name",
args: [],
});
const [tokenDecimals, tokenBalance] = useContractCalls([
{
abi,
address,
method: "decimals",
args: [],
},
{
abi,
address,
method: "balanceOf",
args: [account],
},
]);
return (
<div>
<h1>
代幣地址:
<Input
type="text"
onChange={(event: ChangeEvent<HTMLInputElement>) =>
setAddress(event.currentTarget.value)
}
value={address}
/>
</h1>
<h1>代幣名稱:{tokenName}</h1>
{tokenBalance && (
<h1>代幣餘額:{formatUnits(tokenBalance[0], tokenDecimals)}</h1>
)}
</div>
);
}
|
useContractCall 回傳的實際上是一個陣列,上面的有點小髒這點請注意。 
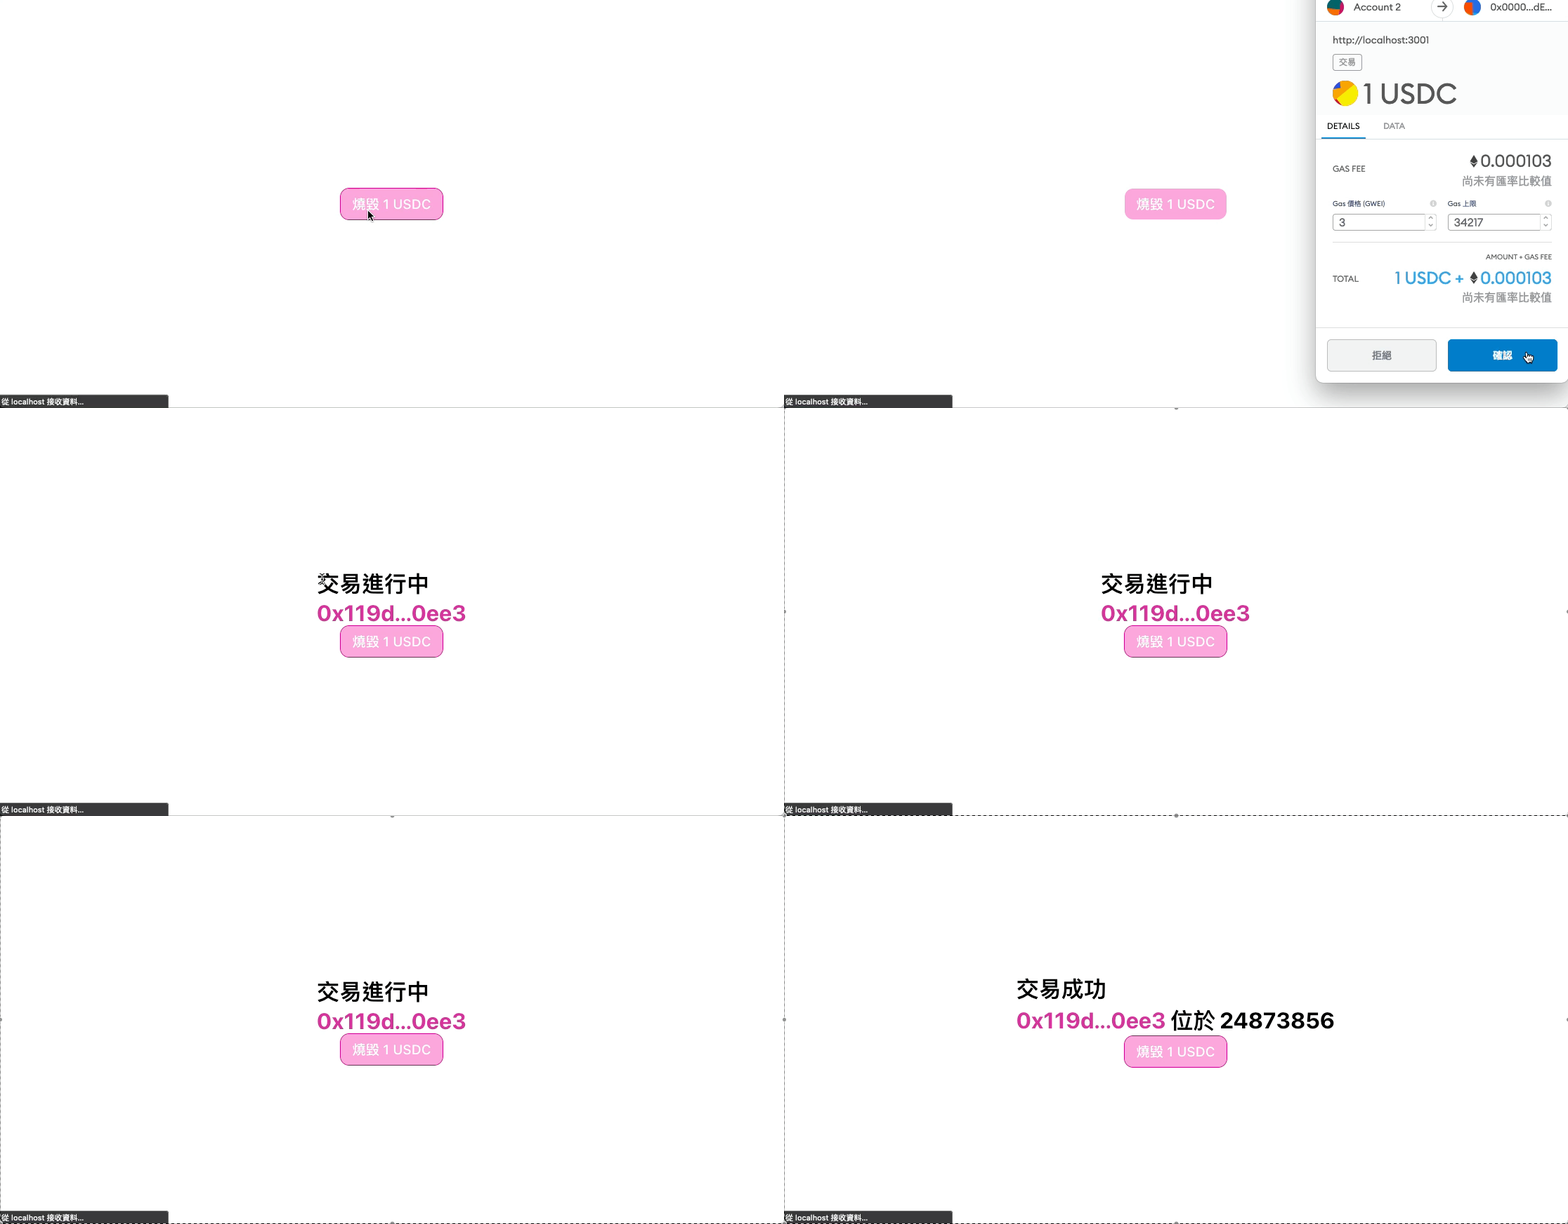
發起交易的呼叫用的則是 useContractFunction,第一個參數要放的是從 Ethers.js 產生的 Contract 物件,Singer 部分不需要設置,useDApp 會自動完成,也可以在第三個參數中設定,第二個參數則是要呼叫的函數名稱:
1
2
3
4
5
6
7
8
9
10
11
12
13
14
15
16
17
18
19
20
21
22
23
24
25
26
27
28
29
30
31
32
33
34
35
36
37
38
39
40
41
42
43
44
45
46
47
48
49
50
51
52
53
54
55
56
57
58
59
60
61
62
63
64
65
66
67
68
69
70
71
72
73
74
75
76
77
78
79
80
81
82
83
84
85
86
87
88
89
90
91
92
93
94
95
96
97
98
99
100
101
| import { Contract } from "@ethersproject/contracts";
import {
ChainId,
getExplorerTransactionLink,
useContractFunction,
useEthers,
} from "@usedapp/core";
const abiJSON = [
{
constant: false,
inputs: [
{
name: "_to",
type: "address",
},
{
name: "_value",
type: "uint256",
},
],
name: "transfer",
outputs: [
{
name: "",
type: "bool",
},
],
payable: false,
stateMutability: "nonpayable",
type: "function",
},
];
const usdcContract = new Contract(
"0xe22da380ee6b445bb8273c81944adeb6e8450422",
abiJSON
);
export default function Transaction() {
const { send, state } = useContractFunction(usdcContract, "transfer");
function shortenTransactionHash(hash: string) {
return hash.substr(0, 6) + "..." + hash.substr(-4);
}
return (
<div>
{state.status === "None" && <></>}
{state.status === "Exception" && <h1>交易失敗,參數不正確</h1>}
{state.status === "Mining" && (
<h1>
交易進行中
<br />
<a
href={getExplorerTransactionLink(
state.transaction.hash,
ChainId.Kovan
)}
>
{shortenTransactionHash(state.transaction.hash)}
</a>
</h1>
)}
{state.status === "Success" && (
<h1>
交易成功
<br />
<a
href={getExplorerTransactionLink(
state.transaction.hash,
ChainId.Kovan
)}
>
{shortenTransactionHash(state.transaction.hash)}
</a>
位於 {state.receipt.blockNumber}
</h1>
)}
{state.status === "Fail" && (
<h1>
交易失敗
<br />
<a
href={getExplorerTransactionLink(
state.transaction.hash,
ChainId.Kovan
)}
>
{shortenTransactionHash(state.transaction.hash)}
</a>
位於 {state.receipt.blockNumber}
</h1>
)}
<button
onClick={() =>
send("0x000000000000000000000000000000000000dead", "1000000")
}
>
燒毀 1 USDC
</button>
</div>
);
}
|
state 下必定會有 status,用來表示交易狀態,一開始會是 None。交易送出後會開始有 transaction,具體物件結構要參考 Ethers.js 的文件(Transaction、TransactionRespones)。需要留意的是 transaction 不會在交易完成後更新,因此如區塊高度等出塊後才有的資料要到 receipt 取得,參考文件是 TransactionReceipt。  上面偷渡了
上面偷渡了 getExplorerTransactionLink 的用法,相似的還有 getExplorerAddressLink。
小結
目前用下來覺得還滿實用的,他可以處理掉很多滿麻煩的事情,例如前面提到的切換帳戶的問題,同時也避免掉需要自行包裝成 Hook 的麻煩。美中不足的地方應該是對 ABI 的支援,目前看下來還是得回到 Ethers.js 上,如果能在 useDApp 中提供或許會更好。其次是合約相關的 Hook 沒辦法根據 ABI 去制定型別,因此無法發揮 TypeScript 的能力去避免錯誤的 Code。最後不確定是不是我的問題,BigNumber 直接用會提示 Overflow。 由於文件沒寫完,所以有些 Provider 和 Hook 我就沒去看了,有興趣的可以翻翻文件。


 上面偷渡了
上面偷渡了