在先前介紹 Crypto-Arsenal 的遷移計畫時,曾經提及我們要增加 Storybook 的應用。其中除了建立文件給未來的工程師外,也包含一併處理 Visual、Interaction 以及 Snapshot 測試。在這篇文章中,將介紹 Storybook Test-Runner 以及我們的用法。
Visual/Interaction/Snapshot 測試
在開始前,我想簡單說明這三類測試的意思。
- Visual Test:視覺上的測試,透過自動擷圖比對的方式,確保視覺上沒有出現差異
- Interaction Test:互動上的測試,透過自動操作,確保使用者操作能夠正確運作
- Snapshot Test:執行上的測試,透過比對實際執行產生的 DOM Tree,確保修改的範圍
不難理解,這三者的測試在不同角度上關注(幾乎)相同的事。Visual Test 與 Snapshot Test 關注人類與電腦角度的不變性,而在互動的不同階段中,我們也可能需要測試這些階段中的中間狀態。
為什麼是 Test Runner
在遷移計畫中提及,我們從 Storyshots + Lost-Pixel 遷移到 Test-Runner,最大理由即是 Storyshots 遭到棄用,同時 Test-Runner 能夠在單一環境處理三種測試,這有助於降低開發時的工作量。
設定方法
以下介紹在 Next.js 14 中使用 Test Runner 的作法,到安裝 Storybook 之前的步驟將省略。需要完整程式碼的可以到此 Repo。
這個的設定目標是:
- 對元件的特定狀態執行 Visual Test 與 Snapshot Test
- 測試 Interaction 正確性
安裝 Test-Runner
將 Test-Runner 新增成 Dev Dependency:
yarn add --dev @storybook/test-runner新增啟動測試的指令到 package.json,由於 Test-Runner 是設計成可以無配置執行,目前不需要添加其他設置。
{
    ...
    "script": {
    "test-storybook": "test-storybook"
    }
    ...
}
如果未曾使用過 Playwright 的話,需要額外安裝 @playwright/test 並下載 Headless Browser Binary:
yarn add --dev @playright/test
yarn playwright install
撰寫 Story
在 Test-runner 中,相當仰賴 Interaction Addon 的 Play function 來模擬操作(雖然即便沒有 Play function,Test-runner 仍然可以驗證渲染成功與否,但相對價值就差了許多)。
建立以下元件以及 Story:
// Button.tsx
import { useState } from "react";

export function Button({ onClick }: { onClick: (cnt: number) => void }) {
  const [count, setCount] = useState(0);
  return (
    <button
      onClick={() => {
        setCount(count + 1);
        onClick(count + 1);
      }}
    >
      {count}
    </button>
  );
}
import type { Meta, StoryObj } from "@storybook/react";
import { fn, userEvent, within } from "@storybook/test";
import { Button } from "./Button";
const meta: Meta<typeof Button> = {
title: "Button",
component: Button,
};
export default meta;
type Story = StoryObj<typeof Button>;
export const Primary: Story = {
args: {
onClick: fn(),
},
play: async ({ canvasElement }) => {
const canvas = within(canvasElement);
await userEvent.click(canvas.getByRole("button"));
},
};回到 Storybook 中,進入 Interaction 頁籤確認 Play function 的運作。
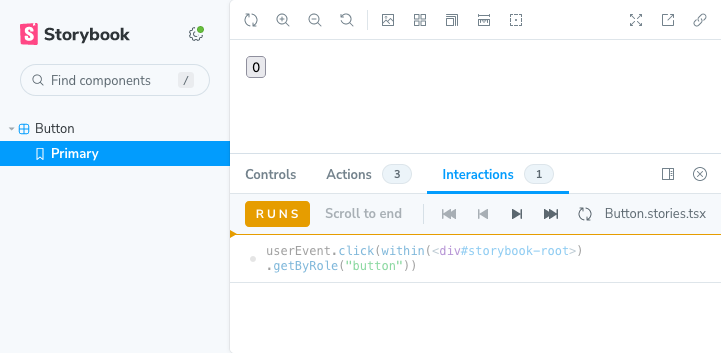
加入 Interaction 測試
在前面新增的 Button 元件中,每點擊一次就會讓數字加一,並將新的數字傳遞給 onClick,可以在 Play function 中增加對此的驗證。
...
play: async ({ args, canvasElement }) => {
const canvas = within(canvasElement);
await userEvent.click(canvas.getByRole("button"));
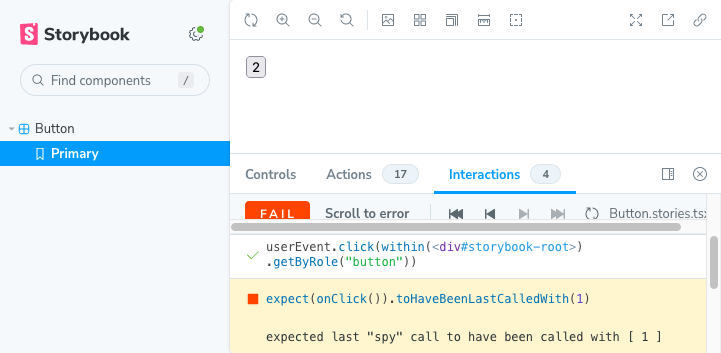
await expect(args.onClick).toHaveBeenLastCalledWith(1);
await userEvent.click(canvas.getByRole("button"));
await expect(args.onClick).toHaveBeenLastCalledWith(1); // should be 2
},
...這裡刻意使第二個 expect 中出錯,並執行 yarn test-storybook 後可以檢查到這個錯誤。

設定 Snapshot 與 Visual Test
Snapshot 與 Visual 測試需要比較多處理,首先安裝 jest-image-snapshot:
yarn add -D jest-image-snapshot接著在 .storybook 中新增 test-runner.ts:
import { type TestRunnerConfig } from "@storybook/test-runner";
import { toMatchImageSnapshot } from "jest-image-snapshot";

const config: TestRunnerConfig = {
  setup() {
    expect.extend({ toMatchImageSnapshot });
  },
  async preVisit(page) {
    if (await page.evaluate(() => !("takeSnapshot" in window))) {
      await page.exposeBinding("takeSnapshot", async ({ page }) => {
        const elementHandler = await page.$("#storybook-root");
        const innerHTML = await elementHandler?.innerHTML();
        expect(innerHTML).toMatchSnapshot();
      });
    }

    if (await page.evaluate(() => !("takeScreenshot" in window))) {
      await page.exposeBinding("takeScreenshot", async ({ page }) => {
        const image = await page.locator("#storybook-root").screenshot();
        expect(image).toMatchImageSnapshot();
      });
    }
  },
};

export default config;
這段程式碼主要在於將 Snapshot 與 Visual Test 的 API 暴露到 Playwright 環境,以利 Play function 使用。
由於目前 Test-Runner 的限制,似乎無法在 Prepare 階段暴露函數,因此這裡選擇在 Previsit 中檢查是否存在後暴露。
加上 Snapshot 與 Visual Test 呼叫
回到 Story,分別呼叫 window.takeSnapshot 與 window.takeScreenshot 兩次(使用 TypeScript 時,可能需要將此兩個函數加入到 Global Declaration:
...
play: async ({ args, canvasElement }) => {
const canvas = within(canvasElement);
await window.takeSnapshot?.();
await window.takeScreenshot?.();
await userEvent.click(canvas.getByRole("button"));
await expect(args.onClick).toHaveBeenLastCalledWith(1);
await window.takeSnapshot?.();
await window.takeScreenshot?.();
},
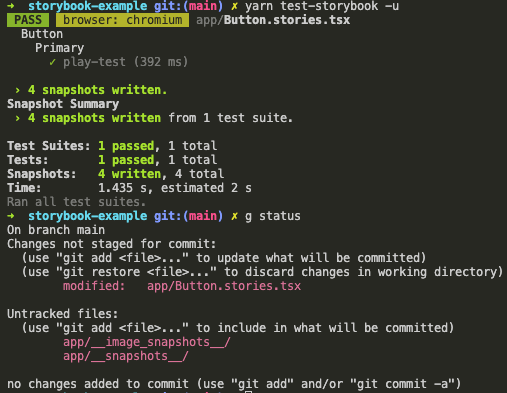
...接著執行 yarn test-storybook -u 後,會自動產生 Snapshot 檔案。
測試 Snapshot Test 運作
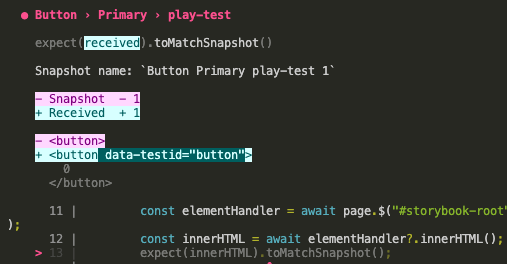
回到元件,增加不影響視覺的屬性:
...
    <button
      onClick={() => {
        setCount(count + 1);
        onClick(count + 1);
      }}
      data-testid="button" // <--
    >
      {count}
    </button>
...
再次執行 yarn test-storybook,出現 Snapshot 錯誤。
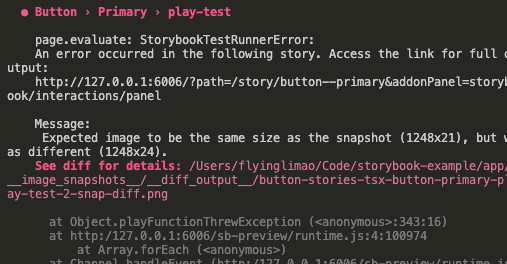
測試 Visual Test 運作
撤回變更,在 .storybook/preview.ts 引入 globals.css 來在不影響 DOM 的條件下引起視覺變化。
import "../app/globals.css"
...
再次執行 yarn test-storybook,出現 Image Snapshot 錯誤。
到此,我們已經設定好 Interaction Test、Visual Test 以及 Sanpshot Test。
結語
在官方的教學中,Snapshot 和 Visual Test 被放置到 Post visit,這使得 Snapshot 與 Visual Test 無法被任意的呼叫,而只能取得最終狀態。研究過後找到了這個方式,使我們可以在需要的時候建立 Snapshot,以更好的配合測試需求。